Saturday 19 May 2012

Good Afternoon!

As you can see my blog is getting a make over.  I am so excited I have actually managed to work out how to make the banners myself.  So now I can up date and change my blog regularly.

This is what has been keeping me busy for the past week. Updating my blog and sorting my website.

Hope you like the changes I am making.  The digital images in my banner are both my own, my children's and I have also incorporate a few from Trina at Digi Scrap Kits. The banner background is from Basic Grey.  These are one of my favourite papers to use for scrapbooking.

Hope you have a wonderful weekend.

Hugs

Fiona xxx

Monday 14 May 2012

Make it Monday! 3D Tutorial

Good Morning!

It's Monday and for Make it Monday I have a tutorial for you on creating 3D stamped images for your cards or projects. For this particular piece I have used a La La Land stamp Kitty Kat Marci.

STEP ONE:  You will need to stamp your image a number of times. For this project I have stamped my image four times in total.  (Three stamps I used to colour for my pop up areas and these will be cut up and the last stamped image I used for the base of my stamp). If you are using digital stamps then print your image a number of times.  To begin with you will need to colour the areas on your stamp that you wish to raise and have popped up, these areas will all be cut out.  This is shown in the photograph below.


For my first areas I have coloured the hat, top and skirt on Marci.


For my second areas I have coloured the ears and crosses on Marci's Hat, the details on her shirt, shoes and the flowers centre.


For the final area to be raised on my stamp I have coloured the flower.


STEP TWO: Once you have coloured each area that you wish to raise you then need to cut them out. This is a little time consuming however it is absolutely worth it as the end result looks wonderful. You can either fussy cut with scissors or you may like to use a craft knife. I prefer the scissors, however it is personal preference.


STEP THREE:  For the base of the image which is the fourth image stamped you then need to colour the rest of Marci these areas are what will remain flat and will be the base for which you will stick the pop up pieces. So in this case I coloured her hair, face and her stockings.  You will notice that I have then coloured all the other areas black.  This is the base for my pop up areas. I have coloured them black as it gives a more finished and professional look when the image is all finished.


This is a close up look of your main completed base stamp of Marci and how it should look just before you are ready to assemble and stick all your raised coloured sections on.


This is what you should start with when ready to stick all your pieces together. To complete your project each cut out coloured area is then stuck on your main completed stamp. 


This is Marci all stuck together. I find zots glue dots the best option for this project. However you can use what you have available. Any 3D glue or sticky dots will work fine.


A close up view of Marci raised. I have cut her out completely to finish the stamp off nicely.


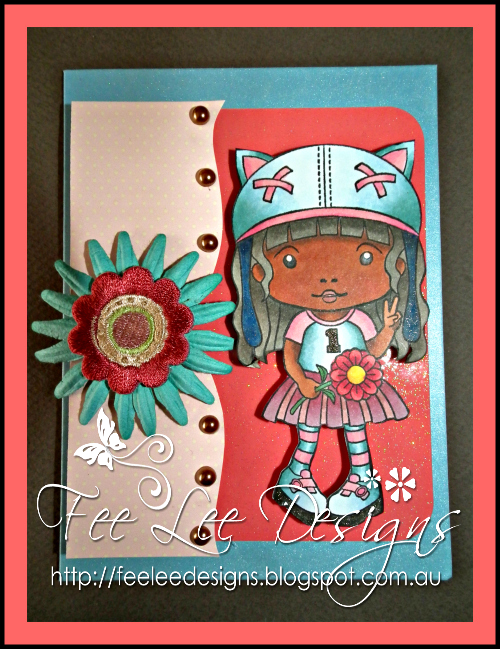
STEP FOUR: Its now time to assemble your completed project on card stock or whatever you wish.  I have chosen to do a sweet little note book for my daughter.


For my completed project I have chosen a blue, red and lemon colour scheme. I have sewn my papers together and used red, white and lemon flowers, blue satin ribbon, pearl accents, a smile embellishment and red brads to complete the notebook!


I hope you like it.  This is particularly fun to do and the end result is so cute! I have linked my final piece to the La La Land Craft Gallery.

Hope you have a wonderful week.

XXX

Fiona xxx


Thursday 10 May 2012

Scrappy go Lucky Copic Tutorial - Skin Colour Basics #2


Good Evening!  It's Tutorial Thursday....


If you have been following along with my tutorials for Scrappy Go Lucky welcome Back.  I firstly apologise for the delay in the posting this tutorial I have been unwell.


This is a follow on from my Skin Colour Basics # 1 tutorial.
With my skin colour basics # 1 tutorial I focused on the basic colouring techniques and tips for Caucasian skin tones. In this tutorial I will be showing you some colour range options for skin tones:


For full instructions on how to colour with Copic Markers please refer to my previous skin tutorials for tips. Skin Colour Basics # 1. With this tutorial I am providing examples for colours that I have used for three different skin tones, Dark African skin, Hispanic skin and Asian skin.


For the following examples I am using the Kitty Kat Marci stamp from La La Land.


Dark African skin tones:  I have used the following Copic Markers E25, E27.


Step One: Begin by colouring the whole stamped image skin area with the base colour E25. 

TIP: Remember to colour in a circular motion when using the Copic Markers as an all over colour.


Step Two: Using the E27 highlight under the hair line and around the cheek area and at the top of the arms to create depth. For each of the examples I am using a central light source. ( Stay tuned for future tutorials on light and shadows ).


Step Three: To complete the skin area of your stamped image use R02 or R83 for cheeks and lips.  BV23 is then used to create a realistic shadow and provide depth to your image.


Step Four:  Finish colouring your stamped image.

Hispanic:   With the next example I have used the following Copic Markers E13, E15.


Step One:  Again begin by colouring the whole stamped image skin area with the base colour E13.


Step Two: Using the E15 highlight under the hair line and around the cheek area and at the top of the arms to create depth. Again I am using a central light source. 


Step Three: To complete the skin area of your stamped image use R02 or R83 for cheeks and lips.  BV23 is then used to create a realistic shadow and provide depth to your image.


Step Four: Finish colouring your stamped image.


Asian:  For my final example I have used the following Copic Markers E53, E42, E41.


Step One: Begin by colouring the whole stamped image skin area with the base colour E41.


Step Two: Using the E53 and E42 highlight under the hair line and around the cheek area and at the top of the arms to create depth. For this stamped image I am using a central light source.


Step Three: To complete the skin area of your stamped image use R02 or R83 for cheeks and lips.  BV23 is then used to create a realistic shadow and provide depth to your image.


Step Four: Finish colouring your stamped image.

I like to use BV23 for shadows to help give a realistic shadow and tone to the skin.


For cheeks I like to use R02 or R83.


These are skin tones that I have played around with however I would like to point out that there are a number of combinations for skin colour.  I suggest experimenting, apart from being extremely relaxing, it's fun and this way you can find a tone that suits your project. Here are a few other skin combinations you might light to try are:


African American: E23, E25, E31, E33, E35

Native American: E13, E15, E17

Caucasian Olive skin tones: E02, E11, E21, E51

Caucasian baby skin tones: E000, E00, R20 blush


Here is a sneak peak of another one of my completed projects I made with this stamped image Kitty Kat Marci from La La Land!  Join me again on Monday for Make it Monday's where I will show you in step by step instructions how to create a 3D stamped project.


Hugs


Fiona xxx


Wednesday 9 May 2012

What's Up Wednesday - Banner

Good Morning!

It's Wednesday already.  Can you believe how fast the year is going!

I am in the process of getting a few blog changes.  I love my background colours however I wanted to personalise my blog a little.  So Trina will be creating a banner for me with my little characters that I painted.  I can't wait to make the changes to my blog it should be lovely!

I am also in the process of completing my website.  I am almost there.  I am so very pleased with it! I will be adding a link to my website directly from my blog.  Which will be hopefully in a few weeks time!

I hope life is treating you all well.

Hugs

Fiona xxx


Tuesday 8 May 2012

Talented Tuesday - Sewing kit

Good Morning everyone!

For Talented Tuesday this week I have my special guest and dear friend Kerry.

She has done the most beautiful sewing box, card and tag. She made this for a friend of hers for her birthday!


I love this its so cute.

Take care and have a lovely week!

Hugs


Fiona xxx


Saturday 5 May 2012

Scrappy Saturday - Leaving Home

Good Evening!


For Scrappy Saturday this week  I am posting two similar layouts that I did for both my children Ayshia and Jostyn.  At a similar age of approximately 3 years old both of my children went thru a stage where on a particular day they decided they were not happy with me for different reasons so they promptly told me they were running away from home.  I might add that this happened as separate incidents for both children at roughly the same age. It was very amusing a the time.  So I came up with two layouts  that reminded me of  Huckleberry Finn with checkered shirts, overalls and a rucksack over there shoulders!  I really loved how these turned out. As I have mentioned before I love the keep things equal in my house so it only seemed fitting that I have a pink and blue layout for my beautiful daughter Ayshia and a green and blue layout for my handsome son Jostyn.


Both layouts are cut into overall shapes and sewn on the sewing machine.  I have then attached buttons for the shirts and buckles for the overalls. To finish off the layout I have added pockets made out of matching card stock and placed co-ordinated fabric in each pocket to look like a handkerchief.  On the front of each pocket I have placed a metal embellishment with each of the children's initial.  On the second pages of the layout I have left room for the children's photograph.  This has been attached with a copper hinge as under the photograph I have written the children both a letter explaining what occurred on the day the decided they wanted to leave me!  I have always taken the time to write down special things that have occurred in my children's lives from silly things they have said to moments like these.  I am so very glad that I took the time too do this because as we all know things happen so fast in life so I don't ever want to forget moments like these!


I hope you like them!


Hugs


Fiona xxx