Showing posts with label Scrappy Saturdays. Show all posts

Saturday, 5 May 2012

Scrappy Saturday - Leaving Home

Good Evening!


For Scrappy Saturday this week  I am posting two similar layouts that I did for both my children Ayshia and Jostyn.  At a similar age of approximately 3 years old both of my children went thru a stage where on a particular day they decided they were not happy with me for different reasons so they promptly told me they were running away from home.  I might add that this happened as separate incidents for both children at roughly the same age. It was very amusing a the time.  So I came up with two layouts  that reminded me of  Huckleberry Finn with checkered shirts, overalls and a rucksack over there shoulders!  I really loved how these turned out. As I have mentioned before I love the keep things equal in my house so it only seemed fitting that I have a pink and blue layout for my beautiful daughter Ayshia and a green and blue layout for my handsome son Jostyn.


Both layouts are cut into overall shapes and sewn on the sewing machine.  I have then attached buttons for the shirts and buckles for the overalls. To finish off the layout I have added pockets made out of matching card stock and placed co-ordinated fabric in each pocket to look like a handkerchief.  On the front of each pocket I have placed a metal embellishment with each of the children's initial.  On the second pages of the layout I have left room for the children's photograph.  This has been attached with a copper hinge as under the photograph I have written the children both a letter explaining what occurred on the day the decided they wanted to leave me!  I have always taken the time to write down special things that have occurred in my children's lives from silly things they have said to moments like these.  I am so very glad that I took the time too do this because as we all know things happen so fast in life so I don't ever want to forget moments like these!


I hope you like them!


Hugs


Fiona xxx


Saturday, 31 March 2012

Scrappy Saturday's - Ahoy Matie

Good Afternoon Everyone!

I am kicking of Scrappy Saturdays with  my layout Ahoy Matie!

I have completed a layout with a Pirate theme for both of my children.  We do a lot of dress up's at our house. Book week, Halloween you name any excuse to dress up!

So I had to come up with a cute layout for my two buccaneers.   I have incorporated stamping and scrapbooking using Copic Markers colouring a Buccaneer Marci stamp and this is what I came up with!   I just loved this image and it reminds me of my daughter so it was a must to have on my scrapbooking layout.  I will be doing the exact same layout for my son using the Pirate Luka stamp.  I like to keep things even in my house! 


 To begin with I chose my colour scheme.  I opted for browns and blues to represent the colours of pirates, wooden ships, blue skies and ocean waters.


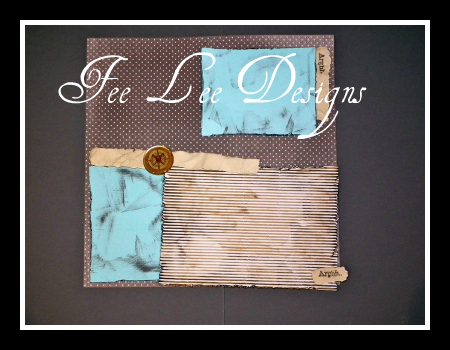
The next thing I did is worked on how I wanted the papers too look.  Texture was important. So working with a corrugated card stock I distressed the sides with my Making Memories distressing tool and used  Chocolate Chip and Early Expresso inks from Stampin Up to create an aged effect. (These particular inks are easy to use and come in a great range of colours).


I then chose the main card stock that I wanted to use for my layout.  I selected a lovely dark brown and light blue polka dot card stock from Rusty Pickle. This worked in perfect with my colour scheme.  I selected light baby blue card stock to for the photos to be mounted onto. Using the same distressing tool I distressed the edges and used the inks to age the card.  To make the labels Arghh I soaked cream card stock in tea to give it an aged effect. This is a great technique which really helps paper to look aged and worn. To do this all you need is your card stock you wish to age, a few tea bags and a baking try. Get your tea ready in the tray and place your paper in the tea, leave it to soak a minute or two once your paper is the desired colour then remove it from the tea. Once dry I then tore the paper into the shape I wanted and stamped it with the word Arghh from the clear cling stamp set by Paper Craft Pirates & Princess.


Using the left over paper from my labels I made the centre piece for my layout using an epoxy compass sticker from Creative Imaginations Scrapbooking Signature Collection to tie it together.


To create a real pirate feel I decided to make a treasure map to go onto my layout.  To begin with I soaked my cream card stock using the same tea method helping to give my paper the aged look. Before allowing it to dry I crinkled the paper very carefully as it can tear being still wet. I then flattened it out a little not too much and I allowed it to dry. Once dry I tore the edges of the map to help make it look authentic. The next step I sketched the map with pencil. When I was happy with how it looked I then outlined my map with fine permanent water proof black pen. I like to use the Copic Multiliner 0.3. The next step involved painting my map with water colour paints to give it a colourful yet worn look. While the paint was still damp I shaped my map rolling the edges on the left under and on the right upwards. This is the best time to shape your map as when it dries it sits perfectly on your page.To finish the map off I used my Chocolate Chip ink around the edges of the map.


Because this particular layout is for my daughter I wanted it do be a little girlie. I coloured my Marci stamp with pinks, brown and teals. Using the following Copic colours.

For Marci's hat and shirt I used RV32, RV93, RV95, R39.
For Marci's skirt B0000, BG72, BG75.
For her shirt colar and sleeves I used B0000, BG72, BG75.
For Marci's boots, belt and vest I used E71, E74.
For the buttons on her boots and vest I used Y26 and Y28.
For the buckle on her belt I used B0000, BG72 and BG75.
For the skull on her hat I used E71 and E74.
For her bag and telescope I used E71, E74, W6 and W7.
For her hair I used Y0000, Y00, Y02, Y26, Y28, YR27 and E74 for depth.
For Marci's skin I used E000, E00, E02 and E11.
Her lips and cheeks I used RV10.
For her earrings I used Y02 and Y28.

I then distressed the edges of the stamped image with my distress tool and used my Chocolate Chip and Expresso ink to age the card stock. Once happy with the stamped image I mounted it onto blue glitter card stock from DCWV which I also distressed around the edges and inked.  To finish the stamped image I used an epoxy sticker YO HO YO HO from the Creative Imaginations Scrapbooking Signature Collection.


The next step involved assembly of my page. I played around with placement. Getting a feel for what looked right.


Happy with how everything was placed I started gluing and using foam sticky dots to put everything into place.


To finish my layout off I needed a title for my Page.  I always remember my little boy Jostyn when dressed in his pirate get up crying out Ahoy Matie!  So it only seemed appropriate I used this phrase.


My final layout.  To finish it off I placed the brown and gold flower card stock from DCVW on the area where the photos are to be placed.  This really finished the page off nicely. Especially with the gold flowers! Around the edge of the photos I also drew stitching.

I hope you like my layout! Thanks for looking.

Hugs 

Fiona xxx


Monday, 26 March 2012

Time to get busy!

Monday Morning!

The weeks are flying by again!  It's already nearing the end of March.  As a child time seemed to go so slow. Now days time is faster than ever.  All those unfinished projects.  I have decided to make a commitment to myself to complete them!  I have a mountain of unfinished scrapbooking layouts which I started with all the best intensions of completing them. Now its time to get them up to date.  So over the next few weeks I will also be posting some layouts that I have completed. I hope you will like them.  I figured if I commit myself to my blog then I have to do them. I will be dedicating a day on my blog especially to scrapbooking. However I will also be doing other things like card making, Copic tutorials, and other art projects that I have been dabbling in as well.  I want to inspire you and give you some ideas on creating new and fun projects.  Art, Design and Crafts are a wonderful outlet. That feeling of getting lost in a project and the end result that you completed something that looks so wonderful is fantastic. So with that in mind this will be how I would like things to progress on my blog.


I want my blog not to be simply a card, scrapbooking or craft blog it is all of these combined.  I know there are crafters out there that are dedicated and are just into card making,  scrapbooking or craft.  However I am a multi tasking type of girl. Yes I love to scrapbook however what I have learned in scrapbooking has crossed over into card making and visa versa. I also love to paint and draw. So I am hoping to provide a little special and something for everyone. What ever you love I hope you find inspiration here with me.  Starting next week.........The Week will goes as follows...........


Make it Mondays will be Cards, Cards, Cards. ( Card making tips and ideas )


Talented Tuesdays will be Guest Designers. However I think I will run something a little differently here. I have decided I am sure there are a lot of you who have wonderful art work and wish to display it however are maybe a little unsure how to post on a blog or ever not sure if your work is good enough. I want to display your work.  It would be my pleasure to do so. So I will be setting up a link where  you can email me photographs of your completed project and I will post it for you.


What's Up Wednesday will be updates and progress with my business ventures. I am in the process of dealing with a manufacturer at the moment to bring out a new line of rubber stamps. This is very exciting for me and as I progress I will keep you posted.


Tutorial Thursdays Every second Thursday will be Copic Tutorials with Scrappy Go Lucky. Which will also lead into classes being held at Scrappy Go Lucky.


Free For All Fridays will be what ever takes my fancy. I will post painting drawings, or something of a similar nature.


Scrappy Saturdays every second Saturday will be dedicated to those completed scrapbooking layouts I keep promising myself. I will give you examples of layouts I have completed and also provide step by step instructions too. Here is a sneak peak of the one I started this Saturday gone and I will be posting the full step by step instructions this Saturday coming. I will also be posting a link on the La La Land Blog Customer Gallery when its completed.


I Look forward to inspiring you and seeing what you create too.

Fiona xxx