Showing posts with label Tutorial Thursdays. Show all posts

Tuesday, 3 July 2012

Good Morning Everyone!

I thought I would post a few photographs that my partner Bill has taken.  He has recently started taking photographs and I really love them.  He has always been interested in Photography and I thought this would be a great way to encourage him to do something he loves.

I really love these. He now has his own blog! Through Bill's Eyes.


I hope you like them!

UPDATE : I would also like to let my followers know that I am changing things around a bit. Because my website is still a work in progress and I am working hard to get this up and running things haven't gone quiet to plan with blogging so I will only be posting tutorials fortnightly. And anything else like cards, scrapbooking layouts etc I will be posting as and when I get the opportunity. This will only be temporary until my website is sorted.  Thanks for taking the time to share my ideas and creations! I hope life is being kind to you all!

Hugs

XXX
Fiona xxx


Saturday, 23 June 2012

Morning Everyone,


Just an update.  I have completed my tutorial for Copics however just having a few technical problems at the moment.  So if I can ask you to bare with me.  Trying to get it sort out now.  I should hopefully have it sorted shortly.


In the meantime I thought I would share my the latest stamp I have coloured with Copic Markers.  This is a Sweet Pea Stamp by Conie Fong called temptation. Very cute little image. I will be doing a tutorial with this one next week.  I will be using it for a shaker card. So I hope you will join me for this one.

Hope you are all having a wonderful weekend!


Hugs XXX
Fiona xxx

Thursday, 14 June 2012

Tutorial Thursday with Scrappy Go Lucky

Good Evening Everyone!


Just an update with Tutorial Thursday with Scrappy Go Lucky. Things will be a little different with the Copic tutorials I will be posting for Scrappy Go Lucky. Unlike previous tutorials  I will put the full tutorial on Scrappy Go Lucky's Blog to begin with. At the same time I will  be asking followers to head over to my blog to have a look at the finished projects I make on completion of my tutorial.

After posting the tutorials with Scrappy Go Lucky around a week or so later I will then put the full tutorials on my Tutorial Page of my blog for my followers to refer back too. This will take place as from next Thursday.

Also keep an eye out for my tips, techniques and tutorials for other projects and ideas that I will be posting on Inspirational Tips, Techniques and Tutorials. To begin with I have posted my 3D Card Tutorial I originally posted on the 14th May 2012. This is a wonderful blog with so many projects, ideas and techniques.


Hugs

XXX


Fiona xxx

Thursday, 10 May 2012

Scrappy go Lucky Copic Tutorial - Skin Colour Basics #2


Good Evening!  It's Tutorial Thursday....


If you have been following along with my tutorials for Scrappy Go Lucky welcome Back.  I firstly apologise for the delay in the posting this tutorial I have been unwell.


This is a follow on from my Skin Colour Basics # 1 tutorial.
With my skin colour basics # 1 tutorial I focused on the basic colouring techniques and tips for Caucasian skin tones. In this tutorial I will be showing you some colour range options for skin tones:


For full instructions on how to colour with Copic Markers please refer to my previous skin tutorials for tips. Skin Colour Basics # 1. With this tutorial I am providing examples for colours that I have used for three different skin tones, Dark African skin, Hispanic skin and Asian skin.


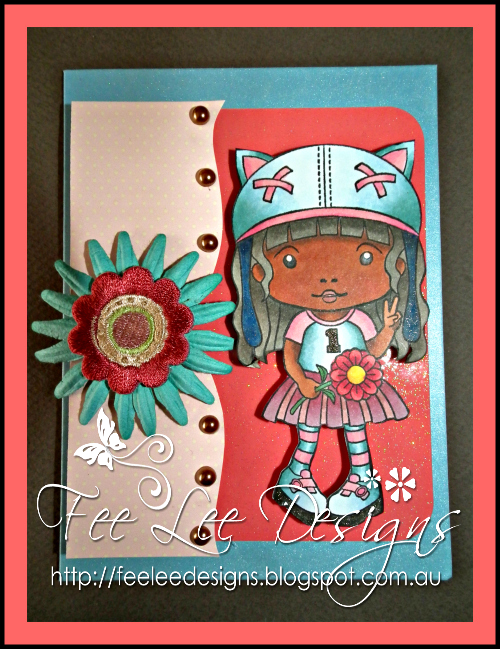
For the following examples I am using the Kitty Kat Marci stamp from La La Land.


Dark African skin tones:  I have used the following Copic Markers E25, E27.


Step One: Begin by colouring the whole stamped image skin area with the base colour E25. 

TIP: Remember to colour in a circular motion when using the Copic Markers as an all over colour.


Step Two: Using the E27 highlight under the hair line and around the cheek area and at the top of the arms to create depth. For each of the examples I am using a central light source. ( Stay tuned for future tutorials on light and shadows ).


Step Three: To complete the skin area of your stamped image use R02 or R83 for cheeks and lips.  BV23 is then used to create a realistic shadow and provide depth to your image.


Step Four:  Finish colouring your stamped image.

Hispanic:   With the next example I have used the following Copic Markers E13, E15.


Step One:  Again begin by colouring the whole stamped image skin area with the base colour E13.


Step Two: Using the E15 highlight under the hair line and around the cheek area and at the top of the arms to create depth. Again I am using a central light source. 


Step Three: To complete the skin area of your stamped image use R02 or R83 for cheeks and lips.  BV23 is then used to create a realistic shadow and provide depth to your image.


Step Four: Finish colouring your stamped image.


Asian:  For my final example I have used the following Copic Markers E53, E42, E41.


Step One: Begin by colouring the whole stamped image skin area with the base colour E41.


Step Two: Using the E53 and E42 highlight under the hair line and around the cheek area and at the top of the arms to create depth. For this stamped image I am using a central light source.


Step Three: To complete the skin area of your stamped image use R02 or R83 for cheeks and lips.  BV23 is then used to create a realistic shadow and provide depth to your image.


Step Four: Finish colouring your stamped image.

I like to use BV23 for shadows to help give a realistic shadow and tone to the skin.


For cheeks I like to use R02 or R83.


These are skin tones that I have played around with however I would like to point out that there are a number of combinations for skin colour.  I suggest experimenting, apart from being extremely relaxing, it's fun and this way you can find a tone that suits your project. Here are a few other skin combinations you might light to try are:


African American: E23, E25, E31, E33, E35

Native American: E13, E15, E17

Caucasian Olive skin tones: E02, E11, E21, E51

Caucasian baby skin tones: E000, E00, R20 blush


Here is a sneak peak of another one of my completed projects I made with this stamped image Kitty Kat Marci from La La Land!  Join me again on Monday for Make it Monday's where I will show you in step by step instructions how to create a 3D stamped project.


Hugs


Fiona xxx


Monday, 26 March 2012

Time to get busy!

Monday Morning!

The weeks are flying by again!  It's already nearing the end of March.  As a child time seemed to go so slow. Now days time is faster than ever.  All those unfinished projects.  I have decided to make a commitment to myself to complete them!  I have a mountain of unfinished scrapbooking layouts which I started with all the best intensions of completing them. Now its time to get them up to date.  So over the next few weeks I will also be posting some layouts that I have completed. I hope you will like them.  I figured if I commit myself to my blog then I have to do them. I will be dedicating a day on my blog especially to scrapbooking. However I will also be doing other things like card making, Copic tutorials, and other art projects that I have been dabbling in as well.  I want to inspire you and give you some ideas on creating new and fun projects.  Art, Design and Crafts are a wonderful outlet. That feeling of getting lost in a project and the end result that you completed something that looks so wonderful is fantastic. So with that in mind this will be how I would like things to progress on my blog.


I want my blog not to be simply a card, scrapbooking or craft blog it is all of these combined.  I know there are crafters out there that are dedicated and are just into card making,  scrapbooking or craft.  However I am a multi tasking type of girl. Yes I love to scrapbook however what I have learned in scrapbooking has crossed over into card making and visa versa. I also love to paint and draw. So I am hoping to provide a little special and something for everyone. What ever you love I hope you find inspiration here with me.  Starting next week.........The Week will goes as follows...........


Make it Mondays will be Cards, Cards, Cards. ( Card making tips and ideas )


Talented Tuesdays will be Guest Designers. However I think I will run something a little differently here. I have decided I am sure there are a lot of you who have wonderful art work and wish to display it however are maybe a little unsure how to post on a blog or ever not sure if your work is good enough. I want to display your work.  It would be my pleasure to do so. So I will be setting up a link where  you can email me photographs of your completed project and I will post it for you.


What's Up Wednesday will be updates and progress with my business ventures. I am in the process of dealing with a manufacturer at the moment to bring out a new line of rubber stamps. This is very exciting for me and as I progress I will keep you posted.


Tutorial Thursdays Every second Thursday will be Copic Tutorials with Scrappy Go Lucky. Which will also lead into classes being held at Scrappy Go Lucky.


Free For All Fridays will be what ever takes my fancy. I will post painting drawings, or something of a similar nature.


Scrappy Saturdays every second Saturday will be dedicated to those completed scrapbooking layouts I keep promising myself. I will give you examples of layouts I have completed and also provide step by step instructions too. Here is a sneak peak of the one I started this Saturday gone and I will be posting the full step by step instructions this Saturday coming. I will also be posting a link on the La La Land Blog Customer Gallery when its completed.


I Look forward to inspiring you and seeing what you create too.

Fiona xxx