Showing posts with label Skin. Show all posts

Thursday, 10 May 2012

Scrappy go Lucky Copic Tutorial - Skin Colour Basics #2


Good Evening!  It's Tutorial Thursday....


If you have been following along with my tutorials for Scrappy Go Lucky welcome Back.  I firstly apologise for the delay in the posting this tutorial I have been unwell.


This is a follow on from my Skin Colour Basics # 1 tutorial.
With my skin colour basics # 1 tutorial I focused on the basic colouring techniques and tips for Caucasian skin tones. In this tutorial I will be showing you some colour range options for skin tones:


For full instructions on how to colour with Copic Markers please refer to my previous skin tutorials for tips. Skin Colour Basics # 1. With this tutorial I am providing examples for colours that I have used for three different skin tones, Dark African skin, Hispanic skin and Asian skin.


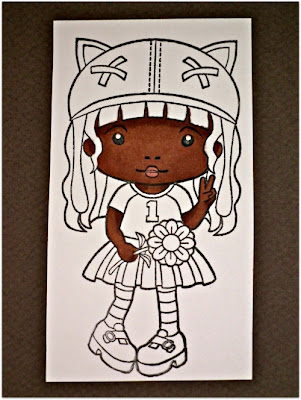
For the following examples I am using the Kitty Kat Marci stamp from La La Land.


Dark African skin tones:  I have used the following Copic Markers E25, E27.


Step One: Begin by colouring the whole stamped image skin area with the base colour E25. 

TIP: Remember to colour in a circular motion when using the Copic Markers as an all over colour.


Step Two: Using the E27 highlight under the hair line and around the cheek area and at the top of the arms to create depth. For each of the examples I am using a central light source. ( Stay tuned for future tutorials on light and shadows ).


Step Three: To complete the skin area of your stamped image use R02 or R83 for cheeks and lips.  BV23 is then used to create a realistic shadow and provide depth to your image.


Step Four:  Finish colouring your stamped image.

Hispanic:   With the next example I have used the following Copic Markers E13, E15.


Step One:  Again begin by colouring the whole stamped image skin area with the base colour E13.


Step Two: Using the E15 highlight under the hair line and around the cheek area and at the top of the arms to create depth. Again I am using a central light source. 


Step Three: To complete the skin area of your stamped image use R02 or R83 for cheeks and lips.  BV23 is then used to create a realistic shadow and provide depth to your image.


Step Four: Finish colouring your stamped image.


Asian:  For my final example I have used the following Copic Markers E53, E42, E41.


Step One: Begin by colouring the whole stamped image skin area with the base colour E41.


Step Two: Using the E53 and E42 highlight under the hair line and around the cheek area and at the top of the arms to create depth. For this stamped image I am using a central light source.


Step Three: To complete the skin area of your stamped image use R02 or R83 for cheeks and lips.  BV23 is then used to create a realistic shadow and provide depth to your image.


Step Four: Finish colouring your stamped image.

I like to use BV23 for shadows to help give a realistic shadow and tone to the skin.


For cheeks I like to use R02 or R83.


These are skin tones that I have played around with however I would like to point out that there are a number of combinations for skin colour.  I suggest experimenting, apart from being extremely relaxing, it's fun and this way you can find a tone that suits your project. Here are a few other skin combinations you might light to try are:


African American: E23, E25, E31, E33, E35

Native American: E13, E15, E17

Caucasian Olive skin tones: E02, E11, E21, E51

Caucasian baby skin tones: E000, E00, R20 blush


Here is a sneak peak of another one of my completed projects I made with this stamped image Kitty Kat Marci from La La Land!  Join me again on Monday for Make it Monday's where I will show you in step by step instructions how to create a 3D stamped project.


Hugs


Fiona xxx


Friday, 23 March 2012

Scrappy go Lucky Copic Tutorial - Skin Colour Basics #1

Good Morning Everyone!

If you are following along welcome back.  If you are new to my blog I hope you enjoy it and find it helpful!

Today I am doing the first of many more in-depth tutorials for Scrappy Go Lucky on how to colour with your Copic Markers.  This tutorial will be covering the first tutorial for colouring skin. For the purpose of this tutorial I am using Copic Sketch Markers. The Markers used will be E00 and E11.  Followed by RV10 for cheeks and lips.

Step One :  To begin with you will need to select the image you wish to colour. I am using the Beach Marci stamp by La La Land.  This is a cute little image and fun to colour.
Step Two:   In my tutorial I will be using only two colours.  The general rule when working with Copics is that you need to work with three colours in order to get the best results. I do find that sometimes there is an exception to this rule and I like to experiment. When colouring skin I have found that you can use just two colours and will still get a wonderful tonal skin effect. You can use these two colours and layer them to look as though you have in fact used more colours and still create the depth and dimension required to bring the image to life. This is especially helpful if you are just starting out with Copic Markers.  So I am going to show you how you can achieve a great result using just the E00 and the E11 in the Copic Range.

To begin you will need to colour the face area with the base colour that you are using. In this case I am using the lightest colour E00 as the base colour.

TIP:  Remember to colour in a circular motion when using the Copic Markers as an all over colour.  This helps to give an even coverage. Also remember the tip of your Marker should never be bending. This means you are colouring too hard.To prevent this hold your marker slightly at an angle.


STEP THREE:  Once you have coloured the face you can then start on the other skin areas, neck, arms, hands and legs. After the complete skin area is covered it you will need to decide where the shadows will appears on your image.

For my stamp I will be doing a centre light source.          
(Imagine the sun is shining straight on her face front on). This will mean that the centre of her face, front middle of the legs and the front of her hands will appear the lightest. This is where the highlights will be.
STEP FOUR:  Its now time to begin to highlight. I like to begin by starting with one side of the image at a time. It is now that you change your colouring technique and use a flicking brush stroke. Remembering to start from the outside edge of your image and flicking in towards the centre of the face.  I also like to break it down into sections. I will do the face first, then the neck area, followed by the arms and hands, then the legs.  It tends to make it easier and I can allow each section to dry whilst I carry on to the next. Always going back and making any changes if I need too. Using E11 I start to flick my marker inwards.
STEP FIVE:  You place your highlights using E11 to the left of the face and to the right of the face and to the top of the hair line. 
STEP SIX:  Now using light strokes with the E00 blend your E11 from where the colour just finishes. Do not colour completely over the entire E11 area. The reason for this is you will change the E11 colour and it will appear washed out. Use very light flicking strokes. You will notice that the image still appears patchy and wet therefore you need to allow this area to dry.   
STEP SEVEN:  You can now move on to the neck area. As you did with the face use E11 to highlight just under the chin area. Allow it to dry and move on to the arms and hands.
STEP EIGHT:  With the arms and hand area highlights are place at the top of the shoulders and along the tips of the fingers. The rest of the areas remain highlighted in the lighter E00. Remember that the light source is coming from the centre or front of the image so the arms will be darker near the neck and shoulder area and the hands will be darker at finger tips near the bottom. With the front middle section appearing lighter and highlighted. Allow this area to dry and move on to the legs.
STEP NINE:  The legs are highlighted using E11 at the top just under the swimming costume and near the ankles on both feet. The front of the leg is what appears highlighted.
STEP TEN:  Go back over each step starting with the face, followed by the neck, arms, hands and legs using the same flicking technique. Re do the dark E11 area first followed by the E00 blending as you go. This will slowly build your image to give depth and dimension.

TIP: Never colour light over dark always using the light colour to move the dark colour away from an area.
STEP ELEVEN:  Once you are happy with your result you can then using the RV10 marker to and blush to your images cheeks, lips and any extra highlights. To apply blush to the cheek area use a light circular motion. If there is too much colour use the E00 to blend outwards. Flicking colour away from RV10 area blending with the flicking technique inwards to centre of the face.
 
Now that the skin area is completed you can move on to the next section of the image.  Like the costume, hat or hair.
Stay tuned for my next tutorial on skin!

For my completed image I coloured it using the following markers.

Swimming costume and Hat: YG61, YG63, G46, Y000, Y00, Y02, Y35 and Y38.
Swimming tube:  YG61, YG63, G43 and G46.
Flowers on hat and tube:  R37, R39, R56 and Y02, Y35, Y38.
Hair: N1, N9, N10, and E71 for tone and B99 for Depth.
Colourless blender also used for corrections.

I like to pick the card stock and colours as I go.


My finished piece!


I have used navy blue card stock for the background colour and navy blue die cuts to make water splashes. Which have been highlighted with glitter to give a water effect.  Yellow card which I have used a paper punch to scollop the edges. The black and white polka dot paper is adhesive paper prints from DCWV. The green checkered paper is from Making Memories Embellishment paper Kids Collection. And the chipboard SUN letters are K.Ology from K&C Company.

Hope you like it!

Hugs  


Fiona xxx