Good Evening! It's Tutorial Thursday....
If you have been following along with my tutorials for Scrappy Go Lucky welcome Back. I firstly apologise for the delay in the posting this tutorial I have been unwell.
This is a follow on from my Skin Colour Basics # 1 tutorial.
With my skin colour basics # 1 tutorial I focused on the basic colouring techniques and tips for Caucasian skin tones. In this tutorial I will be showing you some colour range options for skin tones:
For full instructions on how to colour with Copic Markers please refer to my previous skin tutorials for tips. Skin Colour Basics # 1. With this tutorial I am providing examples for colours that I have used for three different skin tones, Dark African skin, Hispanic skin and Asian skin.
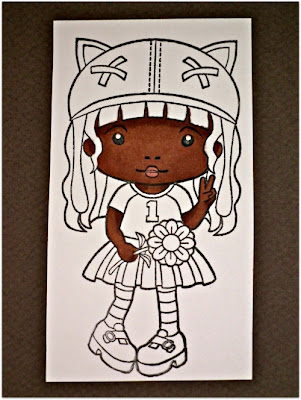
For the following examples I am using the Kitty Kat Marci stamp from La La Land.
Dark African skin tones: I have used the following Copic Markers E25, E27.
Step Four: Finish colouring your stamped image.
Hispanic: With the next example I have used the following Copic Markers E13, E15.
Step One: Begin by colouring the whole stamped image skin area with the base colour E25.
TIP: Remember to colour in a circular motion when using the Copic Markers as an all over colour.
Step Two: Using the E27 highlight under the hair line and around the cheek area and at the top of the arms to create depth. For each of the examples I am using a central light source. ( Stay tuned for future tutorials on light and shadows ).
Step Three: To complete the skin area of your stamped image use R02 or R83 for cheeks and lips. BV23 is then used to create a realistic shadow and provide depth to your image.
Step One: Again begin by colouring the whole stamped image skin area with the base colour E13.
Step Two: Using the E15 highlight under the hair line and around the cheek area and at the top of the arms to create depth. Again I am using a central light source.
Step Three: To complete the skin area of your stamped image use R02 or R83 for cheeks and lips. BV23 is then used to create a realistic shadow and provide depth to your image.
Step Four: Finish colouring your stamped image.
Asian: For my final example I have used the following Copic Markers E53, E42, E41.
Step One: Begin by colouring the whole stamped image skin area with the base colour E41.
Step Two: Using the E53 and E42 highlight under the hair line and around the cheek area and at the top of the arms to create depth. For this stamped image I am using a central light source.
Step Three: To complete the skin area of your stamped image use R02 or R83 for cheeks and lips. BV23 is then used to create a realistic shadow and provide depth to your image.
For cheeks I like to use R02 or R83.
These are skin tones that I have played around with however I would like to point out that there are a number of combinations for skin colour. I suggest experimenting, apart from being extremely relaxing, it's fun and this way you can find a tone that suits your project. Here are a few other skin combinations you might light to try are:
African American: E23, E25, E31, E33, E35
Native American: E13, E15, E17
Caucasian Olive skin tones: E02, E11, E21, E51
Caucasian baby skin tones: E000, E00, R20 blush
Here is a sneak peak of another one of my completed projects I made with this stamped image Kitty Kat Marci from La La Land! Join me again on Monday for Make it Monday's where I will show you in step by step instructions how to create a 3D stamped project.
Fiona xxx


I am new to copic markers. You have made this so easy for me. Thankyou.
ReplyDeleteThanks so much for taking the time to comment. I really do appreciate it. I love Copic Markers and I love to share ideas and tips in the hope I can inspire others.
Delete